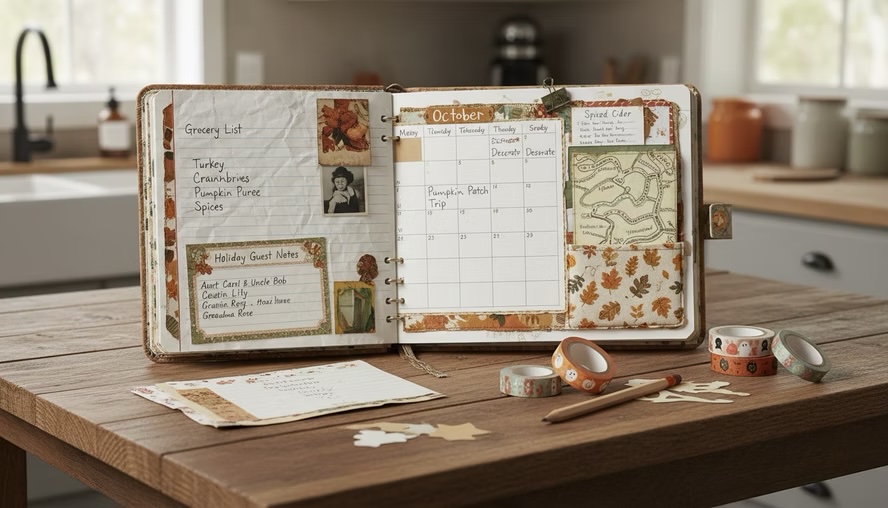
Holiday planning has a way of spreading everywhere. A grocery list lands on the fridge, gift notes hide in a phone app, receipts collect in a bag, and the family calendar fills with school events, travel days, meals, parties, and traditions. By midseason, the plan exists, but it lives in too many places.
A junk journal planner solves that problem without losing the charm of a handmade journal. It gives you calendars, lists, pockets, notes, and memory pages in one place, while still leaving room for paper scraps, photos, handwritten stories, tags, cards, and all the little bits that make the season feel personal.
The best part is that a holiday junk journal does not need to look neat in a store-bought way. It can be layered, patched, taped, stitched, glued, folded, and full of personality. The goal is simple: make a planner that is useful enough to carry you through the season and beautiful enough that you will want to keep it afterward.
A holiday planner can be practical and memory-filled at the same time.
Why a junk journal works so well as a holiday planner
A regular planner is great for structure. A junk journal is great for personality. A holiday junk journal planner gives you both.
The holiday season needs more than appointment slots. It needs room for menu ideas, gift receipts, recipes, travel notes, party details, school reminders, costume plans, cookie lists, gratitude notes, photos, and little stories you do not want to forget. A junk journal naturally welcomes all of that.
Because it is handmade, you can build the planner around your actual season instead of forcing your season into a fixed layout. If Halloween matters most, add more pages for costumes, trick-or-treat plans, spooky movie nights, and neighborhood events. If Thanksgiving is the big gathering, make more space for menus, seating plans, grocery lists, and recipes. If December brings the most activity, build out gift tracking, baking lists, card addresses, and memory pages.
A junk journal planner also encourages you to save the small things:
- A receipt from the pumpkin patch
- A handwritten recipe card
- A gift tag from someone special
- A pressed leaf from a fall walk
- A holiday photo strip
- A note from a child
- A ticket stub from a light display
- Wrapping paper scraps
- A copy of the dinner menu
Those pieces can live beside the practical parts of the planner. That means the book helps you manage the season while you are in it, then becomes a keepsake when the holidays are over.
The real benefit is balance. You get calendar control, list management, and memory keeping without needing three separate systems.
Choose a base that fits the way you plan
The base of the journal sets the tone for the whole project. Some people want quick and sturdy. Others want something vintage and layered. Some want to build the entire book by hand from recycled materials. There is no wrong choice, but each base works best for a different planning style.
Composition notebooks are simple and sturdy
A composition notebook is one of the easiest bases for a holiday junk journal planner. It is affordable, easy to find, and already bound. The pages stay together, the cover is strong, and the size is familiar.
This option works especially well if you want to start fast. You can cover the outside with fabric, gift wrap, scrapbook paper, brown paper bags, or collage. Inside, you can glue in pockets, foldouts, calendar pages, envelopes, and tabs without worrying about binding.
Composition notebooks are also practical for busy households. They can handle being carried in a tote bag, opened on the kitchen counter, and used often. If the notebook has lined pages, those lines help with lists, meal plans, and notes.
A few easy ways to transform one:
- Cover the front with holiday paper, fabric scraps, or a recycled gift bag.
- Add tabs for months, weeks, lists, meals, guests, and memories.
- Glue envelopes to the inside covers for receipts and coupons.
- Tip in extra pages with washi tape or masking tape.
- Add a ribbon closure if the book starts to bulk up.
A composition notebook is the best choice if you want the least setup and the most writing space.
Repurposed books add instant character
A repurposed book gives your planner a vintage, collected feel. Old hardcovers, outdated cookbooks, damaged novels, and thrifted children’s books can all become beautiful holiday planners.
This base works well when you want your journal to feel like an art piece. The printed pages create a background for collage, pockets, and writing panels. You can glue blank paper over sections, leave bits of text showing, or turn illustrations into part of the design.
Repurposed books need a little more prep than composition notebooks. If the spine is tight, remove some pages so the book has room to expand. Junk journals get thick quickly, especially once you add photos, receipts, tags, and folded lists.
Good repurposed book ideas include:
- A cookbook for Thanksgiving or Christmas meal planning
- A children’s storybook for a family memory journal
- A nature guide for a fall-themed planner
- A music book for December concerts and traditions
- A damaged hardcover with a strong spine
To make the pages easier to use, add writing spots. Glue in tea-dyed paper, ledger paper, index cards, shipping tags, or plain copy paper. Use paper clips for moveable notes. Add pockets to pages you want to keep flexible.
A repurposed book is ideal if you want a planner that feels rich, layered, and full of texture from the start.
Handmade journals from envelopes or recycled boxes give full control
If you love building from scratch, make the base yourself. Envelopes, cereal boxes, shipping boxes, paper bags, packaging inserts, greeting cards, and junk mail can become a functional holiday planner.
This option gives you the most control over size and layout. You can create a chunky book with lots of pockets, a slim planner to fit in a bag, or a binder-style journal with removable signatures.
Envelopes are especially useful because they already function as pockets. A journal made from envelopes can hold receipts, gift cards, holiday stamps, coupons, recipe clippings, and photos without much extra work.
Recycled boxes make sturdy covers. Cut two rectangles for the front and back, cover them with fabric or paper, then bind them with rings, ribbon, elastic, or stitched signatures. Cereal boxes work well for lightweight covers. Shipping boxes create more durable ones.
Try these handmade formats:
| Base material | Best use | Helpful tip |
| Envelopes | Receipt storage, coupons, loose notes, gift records | Bind envelopes with the openings facing inward or upward so items do not fall out. |
| Cereal boxes | Lightweight covers and dividers | Cover the printed side with fabric, kraft paper, or collage. |
| Shipping boxes | Strong covers for chunky journals | Score the cardboard before folding to prevent cracking. |
| Paper bags | Rustic pages, pockets, and foldouts | Use the bag opening as a built-in storage pocket. |
| Greeting cards | Decorative dividers and memory pages | Save blank areas for journaling or photo mats. |
A handmade base is best when you want the planner to feel fully personal and resourceful.
Envelopes make instant storage for the busiest parts of the season.
Build the planner around the holiday season
Once you choose the base, think about how the season actually unfolds. A useful holiday planner usually needs three things: a calendar system, list pages, and storage.
You can make the book as detailed or loose as you want, but a few core sections will keep it from becoming only a pretty scrapbook. The goal is to make it easy to open the journal and know exactly where to put information.
Monthly calendars keep the season visible
Monthly calendars give you the big picture. They help you see travel days, school breaks, parties, meal prep, visitors, and deadlines before the month gets crowded.
For a holiday planner, include monthly calendars for the stretch of the season you celebrate and plan for most. Many people like September through January because it covers fall planning, Halloween, Thanksgiving, December holidays, New Year’s, returns, cleanup, and notes for next year.
You can draw calendars by hand, print simple calendar grids, stamp them, or build them from paper scraps. Leave extra space around the edges for notes, stickers, doodles, and reminders.
Useful monthly calendar notes include:
- School events and closures
- Costume deadlines
- Party dates
- Travel plans
- Visitor arrival and departure dates
- Meal shopping days
- Baking days
- Shipping deadlines
- Decorating days
- Community events
- Religious services or holiday gatherings
- Return or exchange reminders
Add a small pocket or tuck spot near each monthly calendar for loose papers tied to that month. For October, that might be a trunk-or-treat flyer. For November, it might be a recipe clipping. For December, it might be a gift receipt or address list.
Weekly calendars turn plans into action
Monthly pages show the big picture, but weekly calendars help you get through the day-to-day work. The holidays come with many small tasks, and weekly pages prevent them from piling up.
A weekly layout can be simple. Draw seven boxes across two pages, or create sections for weekdays and weekend plans. If you like flexible planning, use a running list for the week instead of assigning every task to a day.
Good weekly sections include:
- This week’s events
- Errands
- Calls and messages
- Meal prep
- Cleaning tasks
- Shopping stops
- Craft projects
- Memory notes
- Receipts to file
For junk journal style, make weekly pages with mixed papers. Use ledger paper for lists, book pages for backgrounds, index cards for task boxes, and folded paper for hidden notes. Add clips so you can move important reminders from week to week.
A helpful holiday trick is to create a “next week” area on each weekly spread. This gives future tasks a place to land without cluttering the current week.
To-do lists need clear homes
Holiday to-do lists multiply fast. One list becomes shopping, cleaning, decorating, wrapping, mailing, baking, costume making, guest prep, and event planning. If all of them live on random pages, they get hard to use.
Give your most common lists their own spots. A few dedicated pages can make the whole journal more efficient.
Try these list categories:
- Decorations to put up
- Decorations to repair or replace
- Gifts to buy or make
- Cards to send
- Packages to mail
- Cleaning before guests arrive
- Holiday movies to watch
- Crafts to finish
- Traditions to schedule
- Returns and exchanges
- Supplies to restock
For a flexible system, make master lists on removable tags or folded inserts. That way, you can pull a list out while shopping or move it to another section.
Use checkboxes if you like the satisfaction of marking tasks complete. Use open bullet dots if you prefer a softer list that can change.
Food prep and grocery lists deserve their own section
Food is one of the biggest holiday planning categories, so it helps to keep menus and grocery lists together. Even a small gathering has moving parts: recipes, allergies, timing, ingredients, serving dishes, leftovers, and cleanup.
Create a food section with pages for:
- Holiday menus
- Recipe ideas
- Baking plans
- Grocery lists
- Pantry inventory
- Freezer inventory
- Dishes guests are bringing
- Serving pieces needed
- Prep timeline
- Leftover ideas
For Thanksgiving or a large dinner, add a cooking schedule. Work backward from mealtime and note what can be made the day before. You do not need a perfect chef’s timeline. A simple handwritten plan can save a lot of stress.
For December, include cookie lists, hot cocoa bar supplies, brunch ideas, potluck notes, and edible gifts. For Halloween, add party snacks, allergy-friendly candy notes, and quick dinner ideas for trick-or-treat night.
Pockets are helpful in the food section. Use them for recipe cards, coupons, store receipts, clipped labels, or a printed recipe you do not want to copy by hand.
Guest lists and trick-or-treat locations keep people plans organized
Holiday planning often centers on people. A guest list page helps you track who is coming, who needs directions, who has food preferences, and who is bringing something.
For gatherings, create columns for:
- Name
- RSVP
- Arrival time
- Food notes
- Dish or drink they are bringing
- Seating or sleeping notes
- Follow-up thank-you
This does not need to feel formal. A simple page titled `Holiday Guests` with a few lines under each person can work. Leave room for last-minute changes.
For Halloween, add a trick-or-treat section. This is useful for families, neighborhood groups, or anyone who likes to plan the evening before heading out.
You might include:
- Neighborhood streets to visit
- Houses known for decorations
- Community trunk-or-treat events
- Start and end times
- Meeting spot
- Safety reminders
- Costume notes
- Candy sorting notes
- Photo ideas
If you attend local seasonal events, add a page for pumpkin patches, light displays, craft fairs, school programs, markets, concerts, and parades. Keep flyers, wristbands, tickets, or parking notes in a pocket near the list.
Planning pages work best when lists and calendars sit close together.
Preserve the journaling features that make it special
A holiday junk journal planner should not become all productivity and no memory. The charm comes from the mix. Leave space for the season to surprise you.
The easiest way to preserve the journal side is to build memory areas directly into the planner. Put them near the practical pages so you can capture moments as they happen.
Previous year’s notes help you plan smarter
A page for previous year’s notes is one of the most useful sections you can add. It keeps you from repeating the same small frustrations.
This section can be simple and honest. Write what worked, what did not, and what you want to remember.
Prompts for previous year’s notes:
- What meal did everyone love?
- What dish was not worth making again?
- Which decorations were hard to set up?
- What did we run out of?
- What did we buy too much of?
- Which events felt meaningful?
- Which events felt too stressful?
- What gifts were a hit?
- What traditions should stay?
- What can be simpler this year?
You can also paste in last year’s menu, a photo of the table, a gift list, or a copy of a handwritten note. If you save holiday cards, tuck a favorite one into this section.
Previous notes work like a quiet assistant. They remind you that you already learned things last year, and you do not need to start from scratch.
Next year’s notes catch ideas before they disappear
The next year’s notes section is just as valuable. During the season, ideas show up at inconvenient times. Maybe you find a better way to store ornaments. Maybe a guest mentions a favorite pie. Maybe you notice that you need more serving spoons, fewer desserts, or an earlier start on cards.
Give those thoughts one home.
Useful next year notes include:
- Buy replacement lights.
- Start costume planning earlier.
- Make double the cranberry sauce.
- Skip the complicated appetizer.
- Print address labels before December.
- Save more tissue paper.
- Look for a larger roasting pan.
- Schedule family photos before the calendar fills up.
- Make neighbor gifts in batches.
- Keep a small bin for gift wrap scraps.
Place this section near the back of the planner so it feels like a natural wrap-up area. You can also add a pocket labeled `Next Year` for clipped ideas, color swatches, sale tags, or notes.
When the holiday season ends, this section becomes a planning gift to your future self.
Journaling space keeps photos and memories close
Photos and memories are often the reason a junk journal becomes precious. Make sure the planner has pages where real life can land.
You do not need long journal entries. A few lines can hold a memory beautifully.
Try these memory page ideas:
- Favorite moment of the week
- Best meal
- Funniest quote
- A small thing I want to remember
- A tradition we continued
- A new tradition we tried
- People we spent time with
- How the house felt
- What the weather was like
- A holiday song, movie, or book we loved
Photo spots can be built into the design. Add blank mats where pictures can go later. Use corner pockets so photos slide in without glue. Tape one edge of a photo so it flips up, then write hidden journaling underneath.
For Halloween, include costume photos, candy piles, pumpkin carving, decorated porches, and spooky snacks. For Thanksgiving, include the table, kitchen prep, place cards, recipes, and group photos. For December, add tree decorating, wrapped gifts, outdoor lights, baking days, gatherings, and quiet mornings.
A good memory page does not need to be polished. It only needs to catch the feeling of the day.
Large pockets hold the season’s loose pieces
Large pockets are what make a junk journal planner especially practical. The holidays create loose paper. Receipts, lists, coupons, tags, flyers, cards, ticket stubs, recipe printouts, and notes all need somewhere to go.
Add large pockets to:
- The inside front cover
- The inside back cover
- Monthly divider pages
- Food planning pages
- Gift planning pages
- Memory sections
- The final notes section
You can make pockets from envelopes, paper bags, folded scrapbook paper, greeting cards, or book pages. Reinforce the edges with washi tape, masking tape, fabric tape, or stitching.
Label pockets by purpose:
- Receipts
- Coupons
- Recipes
- Photos
- Cards
- Gift tags
- Events
- Returns
- Memories
- Next year
A large back pocket is especially useful for anything you do not have time to sort. Think of it as the “safe landing place.” When life gets busy, tuck the paper there instead of losing it.
Use simple layouts that are easy to repeat
A holiday junk journal planner can become overwhelming if every page needs to be a masterpiece. Repeating a few layouts keeps the process manageable.
Pick three or four page styles and use them throughout the book. You can still change colors, papers, and decorations, but the structure stays familiar.
The calendar and notes spread
Put a calendar on one page and notes on the facing page. Use the notes page for reminders, menus, events, and ideas.
This layout works well for monthly planning. It gives you structure without crowding the calendar grid.
The list and pocket spread
Use one page for a checklist and the facing page for a pocket. This is perfect for shopping, gifts, food prep, and events.
For example, a Thanksgiving grocery list can sit across from a pocket holding coupons and recipe cards. A gift list can sit across from a pocket for receipts.
The photo and story spread
Place a photo mat on one page and journaling lines on the other. Add a small pocket for extra photos or tags.
This layout keeps memory pages quick to finish. You can add the photo later and write a few sentences when you have time.
The foldout planning page
Foldouts are great for long lists. Tape a folded sheet to the edge of a page so it opens outward. Use it for a master grocery list, guest plan, gift tracker, or cooking schedule.
Foldouts give you extra room without adding another page. They also make the journal feel interactive.
Add dividers, tabs, and labels so the planner stays usable
A junk journal can get wonderfully chunky, but it needs clear navigation. Tabs and labels help you find the right section quickly.
Use sturdy materials for dividers:
- Scrapbook paper
- Cereal box cardboard
- Greeting cards
- File folders
- Old calendar pages
- Laminated paper scraps
- Heavy envelopes
Label your main sections in a way that matches how you think. You might use simple tabs like:
- Calendar
- Weekly
- Lists
- Food
- Guests
- Halloween
- Thanksgiving
- December
- Memories
- Receipts
- Next Year
If you celebrate several holidays, give each one a section. If you prefer planning by function, use categories like food, gifts, events, and memories.
Color coding can help, but keep it simple. Orange tabs for Halloween, brown or gold for Thanksgiving, red and green for Christmas, blue and silver for winter, or neutral kraft paper for everything.
Small details make tabs stronger. Reinforce them with tape, round the corners, or cover them with fabric scraps. If the planner will be used often, durability matters.
Tabs and pockets help a chunky journal stay easy to use.
Keep supplies simple and seasonal
You do not need a room full of craft supplies to make this work. In fact, junk journals are perfect for using what you already have.
Useful supplies include:
- Glue stick or craft glue
- Scissors
- Ruler
- Pens and markers
- Washi tape or masking tape
- Paper clips
- Binder clips
- Envelopes
- Scrap paper
- Old cards
- Brown paper bags
- Ribbon or yarn
- Hole punch
- Stickers or stamps
- Magazine pages
- Junk mail envelopes
- Thin cardboard
Seasonal scraps add charm. Save wrapping paper pieces, packaging, cards, tags, tissue paper, napkins, paper placemats, and ribbon ends. A pretty coffee sleeve, bakery bag, or store tag can become a pocket or decoration.
For a more cohesive look, choose a loose color palette. It does not need to match perfectly. A fall planner might use kraft brown, cream, orange, gold, and deep green. A winter planner might use white, navy, silver, red, and evergreen. A mixed holiday planner can use neutral papers with seasonal accents added by section.
The key is to keep the planner usable. Avoid bulky decorations on pages where you need to write. Save heavy embellishments for covers, dividers, and memory pages.
Make the planner efficient without losing the handmade feel
A junk journal planner should help you move through the season with less scattered paper and fewer forgotten tasks. To keep it efficient, repeat simple systems.
Here are a few habits that make the planner work:
- Write dates on loose receipts before tucking them into pockets.
- Keep a running grocery list instead of starting over each time.
- Move unfinished weekly tasks to the next week during a quick reset.
- Add photos as you go, or leave labeled spaces to fill later.
- Use one pocket for unsorted papers so nothing gets lost.
- Review next year’s notes before putting the journal away.
- Keep a pen clipped to the cover or tied with ribbon.
- Use removable clips for lists you need to carry into stores.
A weekly reset page can help. At the end of each week, ask:
- What is coming next?
- What still needs to be done?
- What receipts should be saved?
- What memory should be written down?
- What can be simplified?
This turns the journal into a working tool, not just a pretty book. It also keeps the creative side alive because you are touching the pages often and adding real pieces of your season.
Add creative extras that make the planner more fun
Once the main sections are built, add small creative features that make the journal enjoyable to use. These details do not have to take much time.
Try a few of these ideas:
- An advent-style countdown with tiny pockets
- A gratitude page for November
- A holiday movie tracker
- A cookie baking log
- A gift wrap inventory
- A family recipe section
- A page for handmade gift ideas
- A wish list pocket for each family member
- A “things we said” quote page
- A neighborhood lights map
- A holiday playlist page
- A card address checklist
- A donation or giving plan
- A winter bucket list
- A decoration inventory
- A page for ornament stories
- A New Year reflection spread
You can also include sensory memory prompts. These are lovely in holiday journals because the season is full of scent, sound, texture, and taste.
Use prompts like:
- The kitchen smelled like
- The weather felt like
- The song I kept hearing was
- The best thing we ate was
- The house looked like
- The funniest moment was
- The quietest moment was
- I want to remember this because
If you enjoy interactive pages, add flaps, tags, belly bands, hidden journaling cards, mini envelopes, and flip-outs. These features keep the journal playful while still serving a purpose.
Plan the order of pages before you glue everything down
It helps to sketch the planner order before you attach pockets and decorations. You do not need a perfect blueprint. A rough page map prevents the book from feeling random.
Here is a simple order that works for many holiday junk journal planners:
| Section | What to include |
| Front pocket | Quick notes, current receipts, coupons, or reminders |
| Year overview | Key dates, travel plans, school breaks, major events |
| Previous year’s notes | Lessons, favorite traditions, things to change |
| Monthly calendars | September through January, or the months you need |
| Weekly pages | Planning spreads for the busiest weeks |
| Holiday sections | Halloween, Thanksgiving, December holidays, New Year |
| Food planning | Menus, grocery lists, prep timelines, recipes |
| People planning | Guest lists, addresses, RSVPs, trick-or-treat plans |
| Memory pages | Photos, stories, quotes, keepsakes |
| Receipts and mementos | Large pockets for storage |
| Next year’s notes | Ideas, reminders, improvements, supplies to buy |
If your planner is small, combine sections. For example, put guest notes and food planning together for each holiday. If your planner is large, give each holiday its own full section with calendars, lists, pockets, and memory pages.
Before gluing, place loose papers inside the book and flip through it. Check whether the order feels natural. Ask yourself where you would look first for a grocery list, a receipt, or a date. The best layout is the one you can use without thinking too hard.
Large pockets turn loose holiday paper into organized keepsakes.
Let the planner become a keepsake after the holidays
At the end of the season, your planner can shift from tool to memory book. Set aside a little time to finish the pages that matter most. Add the last photos. File the final receipts. Write a few notes about what worked and what you want to change.
You do not need to complete every blank space. Blank spots are part of handmade journals. They show that the book was used in real life, during a busy season.
Before storing it, do a simple wrap-up:
- Move important receipts to the right pocket.
- Add final thoughts to next year’s notes.
- Tape in favorite cards or gift tags.
- Label photos if names or dates matter.
- Remove scraps you do not need.
- Add a closing journal entry.
- Tie the book closed with ribbon, fabric, or elastic.
Store the planner with your holiday boxes or on a shelf where you can find it next year. When the season comes around again, open it before you start planning. The notes, lists, and memories will give you a head start.
That is what makes this kind of planner so efficient. It gathers the practical details while they are happening, saves the memories before they fade, and carries useful lessons into the next year.
A holiday junk journal planner does not need to be perfect. It needs to be present. Give it calendars, weekly pages, lists, food plans, guest notes, trick-or-treat details, photo space, and big pockets. Then let the season fill it.
By the time the holidays are over, you will have more than an organized planner. You will have a handmade record of what you planned, what you made, who you gathered with, and what was worth remembering.
 Creativity and Inspiration
Leave a comment